Category: Linux

Linux Stuff

Five Minute Tip: Leveraging configmaps and secrets for environmental variables

Five Minute Tip: Leveraging configmaps and secrets for environmental variables

For me, I’ve have been working with Kubernetes for a while, and I notice that there are only a few issues that stick out when looking at deployment.yaml. That looking deployment YAML files can be pretty lengthy. For example:

cat deployment.yaml
apiVersion: apps/v1
kind: Deployment
metadata:
  annotations:
  labels:
    app: wordpress-nginx
  name: wordpress-nginx
spec:
  progressDeadlineSeconds: 600
  replicas: 1
  revisionHistoryLimit: 3
  selector:
    matchLabels:
      app: wordpress-nginx
  strategy:
    type: RollingUpdate
  template:
    metadata:
      annotations:
      labels:
        app: wordpress-nginx
    spec:
      affinity:
        podAntiAffinity:                                 
          requiredDuringSchedulingIgnoredDuringExecution:
          - topologyKey: kubernetes.io/hostname
            labelSelector:          
              matchLabels:
                app: wordpress-nginx
      containers:
      - image: gcr.io/bearmoo-cloud-net/wordpress-nginx
        imagePullPolicy: Always
        name: wordpress-nginx
        livenessProbe:
          failureThreshold: 3
          httpGet:
            path: /wp-login.php
            port: 80
            scheme: HTTP
          initialDelaySeconds: 20
          periodSeconds: 10
          successThreshold: 1
          timeoutSeconds: 5
        readinessProbe:
          failureThreshold: 3
          httpGet:
            path: /wp-login.php
            port: 80
          initialDelaySeconds: 20
          periodSeconds: 10
          successThreshold: 2
          timeoutSeconds: 5
        resources:
          limits:
            memory: 256Mi
          requests:
            cpu: 20m
            memory: 256Mi
        securityContext:
          allowPrivilegeEscalation: false
          privileged: false
          procMount: Default
          readOnlyRootFilesystem: false
          runAsNonRoot: false
        env:
        - name: PASSWORD
          value: randompassword
        - name: HOSTNAME
          value: www.bearmoo.net
        - name: IPADDRESS
          value: "192.168.0.0/24"
        - name: RUNAS
          value apache

I know that there are times where I want to edit one environmental variable quickly without changing the whole file. Besides, there is another issue as well; The PASSWORD is in plain text! Having to deal with logging programs like Splunk, I know that there is a potential for the passwords to be in the logs, and that’s not good at all. But, I think it can be improved using configmaps and secrets. I can update the deployment to point to another location to import the environmental variables by creating a configmap which is pretty straight forward:

cat sample-configmaps.yaml
apiVersion: v1
kind: ConfigMap
metadata:
  name: wordpress-nginx-configmap
  labels:
    app: wordpress-nginx
data:
  PASSWORD: randompassword 
  IntIpAddress: "192.168.0.0/24"
  HOSTNAME: www.bearmoo.net
  RUNAS: apache

Under data it’s structure is:

<VARIABLENAME>: <VALUE>

That’s pretty simple, right?

Let’s use kubectl to apply the new configmap to the cluster:

kubectl apply -f sameple-configmaps.yaml

Now, time to check if the newly created configmap exist inside of the cluster:

kubectl get configmaps sample-configmaps -o yaml
apiVersion: v1
data:
  PASSWORD: randompassword 
  IntIpAddress: "192.168.0.0/24"
  HOSTNAME: www.bearmoo.net
  RUNAS: apache
kind: ConfigMap
metadata:
  annotations:
  creationTimestamp: "2020-04-29T18:11:23Z"
  labels:
    app: wordpress-nginx
  name: sample-configmaps
  resourceVersion: "10612459"
  selfLink: /api/v1/namespaces/default/configmaps/sample-configmaps
  uid: 31077265-cbb3-4574-a61c-8a3ba8cce759

Yay! it exists! Now time to update the deployment file to point to the configmap.

cat deployment.yaml
apiVersion: apps/v1
kind: Deployment
metadata:
  annotations:
  labels:
    app: wordpress-nginx
  name: wordpress-nginx
spec:
  progressDeadlineSeconds: 600
  replicas: 1
  revisionHistoryLimit: 3
  selector:
    matchLabels:
      app: wordpress-nginx
  strategy:
    type: RollingUpdate
  template:
    metadata:
      annotations:
      labels:
        app: wordpress-nginx
    spec:
      affinity:
        podAntiAffinity:                                 
          requiredDuringSchedulingIgnoredDuringExecution:
          - topologyKey: kubernetes.io/hostname
            labelSelector:          
              matchLabels:
                app: wordpress-nginx
      containers:
      - image: gcr.io/bearmoo-cloud-net/wordpress-nginx
        imagePullPolicy: Always
        name: wordpress-nginx
        livenessProbe:
          failureThreshold: 3
          httpGet:
            path: /wp-login.php
            port: 80
            scheme: HTTP
          initialDelaySeconds: 20
          periodSeconds: 10
          successThreshold: 1
          timeoutSeconds: 5
        readinessProbe:
          failureThreshold: 3
          httpGet:
            path: /wp-login.php
            port: 80
          initialDelaySeconds: 20
          periodSeconds: 10
          successThreshold: 2
          timeoutSeconds: 5
        resources:
          limits:
            memory: 256Mi
          requests:
            cpu: 20m
            memory: 256Mi
        securityContext:
          allowPrivilegeEscalation: false
          privileged: false
          procMount: Default
          readOnlyRootFilesystem: false
          runAsNonRoot: false
        envFrom:
        - configMapRef:
            name: sample-configmaps

Now, instead of a long list of environmental variables in deployment, where pointing to a configmap to import the variables from:

        envFrom:
        - configMapRef:
            name: sample-configmaps

Hrmm. What about Our PASSWORD? Ahh, yes, like creating a configmap, will create a secret file.


apiVersion: v1
data:
  PASSWORD: randompassword
kind: Secret
metadata:
  annotations:
  labels:
    app: wordpress-nginx
  name: sample-secrets
type: Opaque

There are a few differences; the first one is “kind” statement. Where in kind where telling Kubernetes that this is a secret. All so, the value for PASSWORD needs to be encoded. Though this command, our values can be encoded:


echo -n | base64 && echo ""
cmFuZG9tcGFzc3dvcmQ=

Now that I got the output from the last command, it’s time to update the secret file to this:

apiVersion: v1
data:
  PASSWORD: cmFuZG9tcGFzc3dvcmQ=
kind: Secret
metadata:
  annotations:
  labels:
    app: wordpress-nginx
  name: sample-secrets
type: Opaque

Now time to apply the secret into the cluster:

kubectl apply -f sample-secrets.yaml

Now the changes have been applied. Let’s check to see if it’s there?

kubectl get secrets sample-secrets -o yaml
apiVersion: v1
data:
  PASSWORD: cmFuZG9tcGFzc3dvcmQ=
kind: Secret
metadata:
  annotations:
  labels:
    app: wordpress-nginx
  name: sample-secrets
  resourceVersion: "88538"
  selfLink: /api/v1/namespaces/default/secrets/sample-secrets
  uid: 25ae681a-baa2-4239-9dfc-60ad0c8699fa
type: Opaque

Fantastic! Now it’s time to update the deployment file so that the secrets can be used as well:

cat deployment.yaml
apiVersion: apps/v1
kind: Deployment
metadata:
  annotations:
  labels:
    app: wordpress-nginx
  name: wordpress-nginx
spec:
  progressDeadlineSeconds: 600
  replicas: 1
  revisionHistoryLimit: 3
  selector:
    matchLabels:
      app: wordpress-nginx
  strategy:
    type: RollingUpdate
  template:
    metadata:
      annotations:
      labels:
        app: wordpress-nginx
    spec:
      affinity:
        podAntiAffinity:                                 
          requiredDuringSchedulingIgnoredDuringExecution:
          - topologyKey: kubernetes.io/hostname
            labelSelector:          
              matchLabels:
                app: wordpress-nginx
      containers:
      - image: gcr.io/bearmoo-cloud-net/wordpress-nginx
        imagePullPolicy: Always
        name: wordpress-nginx
        livenessProbe:
          failureThreshold: 3
          httpGet:
            path: /wp-login.php
            port: 80
            scheme: HTTP
          initialDelaySeconds: 20
          periodSeconds: 10
          successThreshold: 1
          timeoutSeconds: 5
        readinessProbe:
          failureThreshold: 3
          httpGet:
            path: /wp-login.php
            port: 80
          initialDelaySeconds: 20
          periodSeconds: 10
          successThreshold: 2
          timeoutSeconds: 5
        resources:
          limits:
            memory: 256Mi
          requests:
            cpu: 20m
            memory: 256Mi
        securityContext:
          allowPrivilegeEscalation: false
          privileged: false
          procMount: Default
          readOnlyRootFilesystem: false
          runAsNonRoot: false
        envFrom:
        - configMapRef:
            name: sample-configmaps
        - secretRef:
            name: wordpress-nginx-secrets

Now doing an apply of the file:


kubectl apply -f deployment.yaml

Apply the modified file, Kubernetes will change the state of the deployment for our app based on what the file describes. Now to check if it’s the variables are there:

kubectl exec -it wordpress-nginx-jj13123klj-gj981 /bin/bash
# env
...
IntIpAddress=10.42.0.0/16
PASSWORD: randompassword 
IntIpAddress: "192.168.0.0/24"
HOSTNAME: www.bearmoo.net
RUNAS: apache
...

Nice! I can see that the variables are inside of the container, and our deployment YAML file is a little simpler to read. All so reducing the possibility of the password getting logged in a logging program such as Splunk.
Five Minute Tip: Kubernetes helm in multiple namespaces

Five Minute Tip: Kubernetes helm in multiple namespaces

A while ago I’ve upgraded the infrastructure to work in Kubernetes and having the application separated though namespaces. I’ve created deployment files and use helm to install applications in the cluster. I’ve found that using helm in multiple namespaces requires a bit extra editing to make it work.

Assuming helm client has been installed and ready to go. We’ll create a service account:

kubectl -n myapp create serviceaccount tiller

This basically creates a serviceaccount called tiller in a namespace called myapp. Now will need to create a cluster role binding for the account.

kubectl create clusterrolebinding tiller -n myapp --clusterrole=cluster-admin --serviceaccount=myapp:tiller

The –clusterrole=cluster-admin is defining what role is the account going to have. In this case, a cluster-admin role. The account can go beyond a namespace and view resources cluster-wide. The last part –serviceaccount=myapp:some-tiller-account tells Kubernetes where to install the service account. In this case, inside the namespace myapp.

Then install helm into that namespace:

helm init --service-account tiller --tiller-namespace myapp

Oh wait, what if we need helm to work in multiple namespaces? That easy! We can recycle the last command and installed a to install a service account into a different namespace:

kubectl create clusterrolebinding some-tiller-account -n mydata --clusterrole=cluster-admin --serviceaccount=mydata:tiller

Next, will need to update the clusterrolebinding so that helm can see what’s inside of another namespace.

kubectl edit clusterrolebinding tiller -n myapp

Origonal:
apiVersion: rbac.authorization.k8s.io/v1
kind: ClusterRoleBinding
metadata:
  name: tiller
roleRef:
  apiGroup: rbac.authorization.k8s.io
  kind: ClusterRole
  name: cluster-admin
subjects:
- kind: ServiceAccount
  name: tiller
  namespace: myapp

Updated:
apiVersion: rbac.authorization.k8s.io/v1
kind: ClusterRoleBinding
metadata:
  name: tiller
roleRef:
  apiGroup: rbac.authorization.k8s.io
  kind: ClusterRole
  name: cluster-admin
subjects:
- kind: ServiceAccount
  name: tiller
  namespace: myapp
- <span style="color: rgb(255, 0, 0);" data-mce-style="color: #ff0000;">kind: ServiceAccount</span>
<span style="color: rgb(255, 0, 0);" data-mce-style="color: #ff0000;">  name: tiller</span>
<span style="color: rgb(255, 0, 0);" data-mce-style="color: #ff0000;">  namespace: mydata</span>

That it! When you do a helm install or helm ls you should beable to see inside both namespaces.

Linux: Five Minute tip

Linux: Five Minute tip

I remember when I first started as Linux System Administrator, I would google Linux command lines. Expectedly if I was looking for a command but not sure what it might be called. It was not until I came across a command called apropos. It has saved my bacon and time when I was in a bind.

Looking at the command apropos:

In computingapropos is a command to search the man page files in Unix and Unix-like operating systems. apropos takes its name from the English word with the same spelling that means relevant. It is particularly useful when searching for commands without knowing their exact names. – source: wiki – apropos

basically, this command will search through the manpages in the description and manuals for the command that is being searched. Seeing the command I action:

apropos dmesg

dmesg (1) – print or control the kernel ring buffer
vmcore-dmesg (8) – This is just a placeholder until real man page has been written


That’s really cool how a simple the command it. You use the man command to read the manual of the command to go more in-depth with it.

My take on this; I’m glad that I’ve found this command and it has served my well up to the is.

Creating Self-Signed Certs on Apache 2.2

Creating Self-Signed Certs on Apache 2.2

This page will walk though the process of creating a secure Self_Signed Certificate for Apache2. In order to get started you will need to make sure that OpenSSL is installed. If it is not install, refer to the site: http://www.openssl.org on how to install the software.

===== Getting Started =====

Need to generate a key. So will enter the fallowing command:


openssl genrsa -des3 -out newca.key 4096

After awhile it will prompt you to enter the fallowing information:

Country Name (2 letter code) [AU]:
State or Province Name (full name) [Some-State]:
Locality Name (eg, city) []:
Organization Name (eg, company) [Internet Widgits Pty Ltd]:
Organizational Unit Name (eg, section) []:
Common Name (eg, YOUR name) []:
Email Address []:


Create a certificate and sign it. This example certificate will last 365 days:
openssl req -new -key newca.key -out newca.csr
openssl x509 -req -days 365 -in newca.csr -signkey newca.key -out newca.crt

===== Getting around Apache prompt =====

If the cert is protected with a password, by default Apache will prompt for the password when it starts. This can be a problem since you will need to enter the password each time Apache is restarted. We can fix this by having Apache call a program that gives the password to Apache. Will create a script in /etc/apache2/ssl name password.sh. Then add the fallowing into the script:

^ /etc/apache2/ssl/password.sh ^
| #!/bin/bash |
| echo ‘password’; |

Change the password to something better. For example: idon7kn0w or ugh1d0ntl1kepassw0rd5

In you Apache config files edit where the SSLPassPhraseDialog is at and add exec:/etc/apache/ssl/password.sh

^ /etc/apache2/modules.d/40_mod_ssl.conf ^
| exec:/etc/apache/ssl/password.sh |
| |


SSLPassPhraseDialog exec:/etc/apache2/ssl/password.sh

Now the needs to be executable:

chmod a+x /etc/apache2/ssl/password.sh

If the SSLPassPhraseDialog does not work, Then you will need to generate and key and cert that will not prompt for a password. To do that enter the fallowing commands and copy the key into your apache ssl folder.


openssl rsa -in newca.key -out newca.key.insecure
mv newca.key newca.key.secure
mv newca.key.insecure newca.key

Source: http://www.tc.umn.edu/~brams006/selfsign.html

Linux tib bits…

Linux tib bits…

[toc]

Linux Networking Devices

Udev naming

There a few network gotchas when adding a new network card or copying VMs. The issue starts when an existing the name of the network adapter changes (e.g., from eth0 to eth1) network adapter’s MAC address changes because a configuration script in linux associates the name of the network adapter with its MAC address. It can be disabled:

Disable udev persistent net generation

echo -n > /etc/udev/rules.d/70-persistent-net.rules
echo -n > /lib/udev/rules.d/75-persistent-net-generator.rules

# disable udev persistent net generation

echo -n > /etc/udev/rules.d/70-persistent-net.rules
echo -n > /etc/udev/rules.d/75-persistent-net-generator.rules

Systemd naming

With systemd, network devices are named differently(ie. enp0s0 or wlp2s0). Although this provides a more consistence naming convention with network adapters in linux, in some cases, The old style naming is sometimes needed for environments or scripts. To fix that, In grub:

Change:

title Gentoo Linux 4.4.1
root (hd0,0)
kernel /kernel-genkernel-x86_64-4.4.9-gentoo root=ZFS dozfs init=/usr/lib/systemd/systemd
initrd /initramfs-genkernel-x86_64-4.4.9-gentoo

To:

title Gentoo Linux 4.4.1
root (hd0,0)
kernel /kernel-genkernel-x86_64-4.4.9-gentoo root=ZFS dozfs init=/usr/lib/systemd/systemd net.ifnames=0
initrd /initramfs-genkernel-x86_64-4.4.9-gentoo

Magic SysReq

I have gotten into situations where the subsystems or subproccesses on a running system maybe not be performing as expected. If you ever need to reboot the host and its not connected to an pdu magic SysReq is the next best options.

You can activate it by:


echo 1 > /proc/sys/kernel/sysrq

If you need to reboot the host:

echo b > /proc/sysrq-trigger

Note: This will cause the kernel to send an instruction to the cpu to reset and it will not show down any processes cleanly and the same goes to the filesystem. USE WITH CAUTION!

To make it permanently turn on:

echo “kernel.sysrq = 1” » /etc/sysctl.conf

More infromation can be found: If you would like to learn more about magic SysRq you can read the sysrq.txt file in the kernel documentation. http://www.mjmwired.net/kernel/Documentation/sysrq.txt

connecting a virtual console with VirtualBox and SoCat

connecting a virtual console with VirtualBox and SoCat

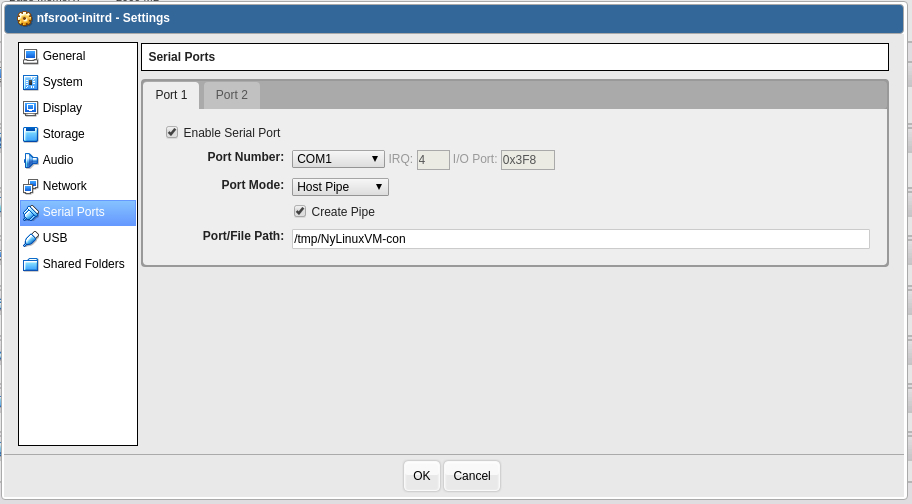
There are times when being able to connect a console to a terminal application becomes useful. For example, Getting kernel panic messages and you need to get the entire message so that it can help you figure out what is going on. If using Virtualbox on linux, the serial console with need to be setup:


Once that is set, download and install the command screen and socat.

yum install screen socat

When the programs have finished installing. Run this command:

./socat-2.0.0-b9/socat UNIX-CONNECT:/tmp/NyLinuxVM-con PTY,link=/tmp/NyLinuxVM-con-pty &

This creates a socket to the virtual machines console and the & allows it run in the background.


screen /tmp/NyLinuxVM-con-pty

Now I can connect to the console using the command screen.

%d bloggers like this: